Use Streaming Imports to Improve Development Workflow and Save Hard Disk Space
One feature I love about Snowpack is streaming imports, the ability to run your application dependencies from a CDN instead of installing them locally. This not only saves you precious time, but also saves your hard drive space. No more running npm install to fill up /node_modules with tons of dependencies in every single project. In this article I'll show you how to quickly set up React and Redux with Snowpack and streaming imports. We'll just do minimal entries to demonstrate how it works.
For this project we'll borrow some code from Tania Rascia's excellent Redux Tutorial .
Start by creating a directory for this project:
mkdir streaming-imports
cd streaming-imports
npm init -y
Now, the one thing you will need to install is Snowpack.
npm i -D snowpack
Next, let's create a configuration file for Snowpack:
npx snowpack init
Make sure your config file indicates the source of our dependencies as "remote", and don't forget to mount the /src directory:
module.exports = {
  mount: {
    src: '/'
  },
  plugins: [
    /* ... */
  ],
  packageOptions: {
    source: 'remote'
  },
  devOptions: {
    /* ... */
  },
  buildOptions: {
    /* ... */
  },
};
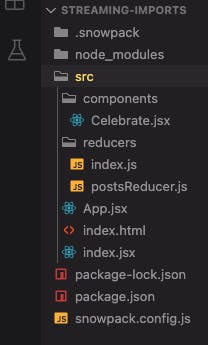
Now, the fun part. Create a /src directory and in it create the following files: App.jsx, index.html, index.jsx; and the following sub-directories: /reducers, /components.
We will add a couple more files and your project directory should look like this:

Next, let's populate the content of our files.
index.html
<!DOCTYPE html>
<html lang="en">
  <head>
    <meta charset="UTF-8" />
    <meta http-equiv="X-UA-Compatible" content="IE=edge" />
    <meta name="viewport" content="width=device-width, initial-scale=1.0" />
    <title>Snowpack Streaming Imports</title>
    <script src="./index.js" type="module"></script>
    <!-- CSS Reset -->
    <link
      rel="stylesheet"
      href="https://cdnjs.cloudflare.com/ajax/libs/normalize/8.0.1/normalize.css"
    />

    <!-- Milligram CSS -->
    <link
      rel="stylesheet"
      href="https://cdnjs.cloudflare.com/ajax/libs/milligram/1.4.1/milligram.css"
    />
  </head>
  <body>
    <div id="root"></div>
  </body>
</html>
index.jsx
import React from 'react';
import ReactDOM from 'react-dom';
import { createStore, applyMiddleware } from 'redux';
import { Provider } from 'react-redux';
import thunk from 'redux-thunk';
import { composeWithDevTools } from 'redux-devtools-extension';

import App from './App';
import rootReducer from './reducers';

const store = createStore(
  rootReducer,
  composeWithDevTools(applyMiddleware(thunk))
);

ReactDOM.render(
  <Provider store={store}>
    <App />
  </Provider>,
  document.getElementById('root')
);

// Credit: Tania Rascia
// https://www.taniarascia.com/redux-react-guide/
App.jsx
import React from 'react';
import Celebrate from './components/Celebrate';

export default function App() {
  return (
    <>
      <div className='container'>
        <h1>Hello everyone!</h1>
        <p>We got React and Redux working.</p>
      </div>
      <Celebrate />
    </>
  );
}
Create reducer /reducer/index.js
import { combineReducers } from 'redux';
import postsReducer from './postsReducer';

const rootReducer = combineReducers({
  posts: postsReducer,
});

export default rootReducer;

// Credit: Tania Rascia
// https://www.taniarascia.com/redux-react-guide/
Create reducer /reducer/postsReducer.js
export const initialState = {
  posts: [],
  loading: false,
  hasErrors: false,
};

export default function postsReducer(state = initialState, action) {
  switch (action.type) {
    default:
      return state;
  }
}

// Credit: Tania Rascia
// https://www.taniarascia.com/redux-react-guide/
Finally, let's create our component /components/Celebrate.jsx
import React from 'react';
import confetti from 'https://cdn.skypack.dev/canvas-confetti';

export default function Celebrate() {
  const handleClick = () => {
    confetti();
  };
  return (
    <div>
      <button onClick={handleClick}>Click to Celebrate!</button>
    </div>
  );
}
To test this out, run npx snowpack dev in your terminal. You should see something like this showing the dependencies being brought from a CDN (powered by Skypack):

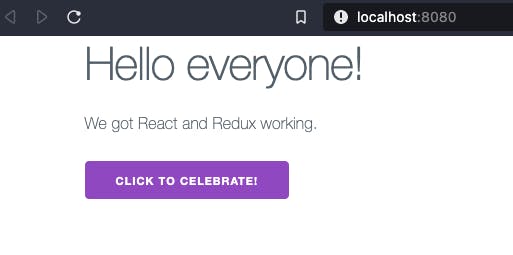
Your browser should have opened at http://localhost:8080/ and should look like this:

That's it. Enjoy! From here you can continue experimenting, and if you are new to Redux I highly recommend Tania's guide.
Code is available in my Github repo .
If you'd like to know more, here's a link to the documentation .
Cover photo by Marc-Olivier Jodoin on Unsplash
